Before we start
In this guide, I’ll take you through the complete process of sourcing leads on LinkedIn and nurturing them with automated tools. You’ll be surprised at how straightforward it is. Often, people overlook these methods simply because they’re not fully aware of the capabilities of current technologies.
My approach to work is decidedly cost-effective. I primarily serve B2B startups, which means I have to identify solutions that are not only affordable but also capable of scaling up quickly. I constantly remind my clients that return on investment hinges on both increasing revenues and controlling costs. Consequently, the tools I choose might not be the most visually striking, but they are budget-friendly, sufficiently comfortable to use, and above all, they get the job done.
Throughout this guide, I’ll cover not only the technological aspect, but also the psychological aspect of lead generation and how to do it correctly. If you are familiar with scraping techniques, you may wonder why not scrape LinkedIn with Python code, enter the data in the CRM, and send an email. You can do it yourself, but in most cases this method will not work.
It is crucial to understand the prospect and to contact them at the right time when they are primed for your approach. The next section of this discussion will focus on this critical aspect.
You might find this guide to be different from other guides and recommendations you have read. My goal was to explain the entire process of generating leads from LinkedIn. There is an in-depth explanation of the process in every section of the article. You can see that my approach emphasizes various platforms and methods. The general process I recommend is as follows:
1. Sourcing
-
Become a thought leader on LinkedIn.
-
Automated LinkedIn outreach
2. Use a tool such as Make or Zapier to automate the import of leads into the CRM
3. CRM
-
Label the leads as MQL (Marketing Qualification Leads) or SQL (Sales Qualification Leads).
-
Create a unique dynamic list for them.
-
Create a workflow specifically for them to nurture them further.
How to Source Leads in the Most Converting Way
B2B contexts tend to be less accepting of marketing approaches, which is why it’s vital to keep in mind that people don’t like feeling ‘sourced’ or ‘generated’ when it comes to lead generation. As such, the strategies we use for lead sourcing must be subtle, highly personalized, and provide significant value. If we neglect these aspects, we risk not only losing their interest but also potentially irritating them upon making contact.
In my case, I always make sure that people on my target list will have even the most minor affiliation with me. familiar with me. That ensures higher chances of people approving my connection request and replying my messages. How you do it –
Step 1 – Make prospects know who you are before contacting them
So how you warm up leads before approaching them? The best way of doing that is by investing in social efforts on LinkedIn. Once you connect with the right audience, share the right information, and engaging correctly, people are more likely to approve your connection request and to reply your messages. Unlike other platforms, LinkedIn enables you to poition yourself as a thought leader and as an expert in your domain.
From my experience, the key to LinkedIn success starts with a very strong social activity. I’ll leave the topic of social activities for another article, but I would just like to add that from my experience, a very strong social activity is the key for success. Here are some recommendations:
-
Post between 2-3 posts a week – Your post should establish you as an expert in your field, showcasing your expertise and personal journey to build trust and encourage people to reach out to you. Focus on topics that highlight your professional insights and personal experiences, including your aspirations, successes, and challenges. Share aspects of your family life, work-life balance, religion, and hobbies to demonstrate authenticity, making it easier for followers to connect with you as a real, relatable person.
-
Create videos. Videos are highly effective for engaging audiences on LinkedIn. Keep them under a minute and focus on a single topic. Use your smartphone to record a casual, authentic video, as if sharing an anecdote during a busy day. This approach resonates with people’s desire for genuine content.
-
Invite followers to the company page. You can send a maximum number of 250 invites per month.
-
Connect to new potential clients and partners.
-
Take part in the platform very actively. Comment on other people’s posts.
-
Don’t be afraid of your competitors. LinkedIn is akin to a continuous conference. Engage with your competitors’ posts by sharing insights, experiences, and asking questions, while being respectful. This strategy exposes their audience to your profile. For instance, when I acknowledged my competitors and expressed appreciation for them on LinkedIn, their responses and compliments led their contacts to discover and follow me too.
-
Use hash tags – LinkedIn now organizes content by topics, so using relevant hashtags (limit to 3-4 per post) helps the platform identify and present your content to interested users.
-
Tag people and companies.
Step 2 – Automating your Outreach on LinkedIn
As you enhance your LinkedIn profile and content, begin reaching out to your target audience. While manual connection requests are possible, using an external tool is more efficient for tracking progress and measuring success rates. Additionally, as observed in my sequences, I employ multiple steps before directly contacting connections.
There are several tools available in the market for automating your LinkedIn activities. I recommend using Dripify or Waalaxy. You may read about the differences between them in another article I wrote in this topic. Both products offer the largest amount of engagement possibilities. Expandi and Apollo are also useful tools but focus more on SDR features like calling. They aim to provide a comprehensive solution for outbound activities, automating lead sourcing from LinkedIn and engagement through emails and calls. However, I believe their search and engagement capabilities are not as robust as Dripify and Waalaxy. I recommend Apollo and Expandi when LinkedIn isn’t your sole lead source. For LinkedIn-focused strategies, the platforms and workflow I suggest in this guide may offer more advantages.
In this guide I will explain the process with Dripify–
Dripify enables you to construct a LinkedIn sales funnel through a series of automated actions like auto-connect, auto-message, auto-view profile, auto-endorse skills, auto-follow, and auto-like. It allows setting delays between actions, selecting conditions, and launching campaigns. Here’s how to use Dripify:
1. Open your account by clicking here.
2. Connect your account to LinkedIn.

Enable Dripify to access your account
3. Upgrade your plan
Dripify offers a default free trial, but I recommend upgrading to the largest package, priced at $99 per month or $79 per month with a yearly commitment. The key advantage of this package is the “LinkedIn activity control” feature. This feature monitors your overall LinkedIn activity and adjusts your automated actions to align with your personal activity on the platform. For example, if you’ve liked several posts manually, the system will pause similar activities for a few hours to prevent LinkedIn from detecting repetitive, automated behavior, which could violate its regulations.

Don’t give up the LinkedIn Activity Control
4. Click on “Settings” in the left-side navigation bar to begin fine-tuning your settings.
a. To configure your preferences, navigate to the “Limits & Activity control” page.
Ensure that the “LinkedIn Activity Control” feature is activated. Remember, this function is available only with the $99 package. Without this package, you’ll have to manually calculate the number of actions, which can be time-consuming.

b. Set “Working hours” page
Ensure your automation is scheduled for the specific days and times you prefer. For instance, in my settings, I’ve disabled automation on Saturdays and Sundays. I strongly advise against running the automation during weekends.

C. Create your first templates
I recommend crafting templates through the settings rather than within the campaign. Let me show you an example of the template I use most frequently.
My Master Lead Generation Template
The purpose of this sequence is to address both new connections as well as existing connections. The most efficient way to do that is by creating an automation with several branches. I always start with the “If connected” condition, and then I create different branches to what happens if we are already connected vs. if we are not.

Starting point of the automation
Let’s start with the “already connected” branch
In this approach, the focus is on sending messages to prospects to invite them for a meeting. However, it’s important to remember that just because you’re connected with someone on LinkedIn doesn’t mean they’re familiar with you. Therefore, before sending any messages, I’ll concentrate on creating engagement with the prospect. This ensures my name appears in their notifications and emails, increasing recognition and familiarity. My flow usually looks like this:
-
like a post
-
View profile (after two hours)
-
follow (after two hours)
-
Message @1 (after two hours)
The sequences keep running until the prospect responds; once they reply, the sequence halts for that individual. Typically, I attempt three messages before concluding the sequence. It goes like this:
-
like a post
-
View profile (after two hours)
-
follow (after two hours)
-
Message @1 (after two hours)
-
Wait for three days
-
Like a post
-
View profile (after two hours)
-
Message @2 (after two hours)
-
Wait for three days
-
Like a post
-
View profile (after two hours)
-
Message @3 (after two hours)
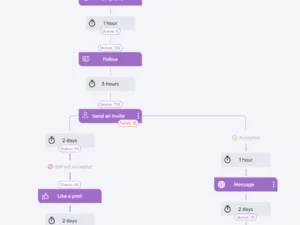
This is a short snippet from the workflow:

Let’s continue with the “non-connected” branch
This branch serves multiple functions:
-
Nurturing prospects before sending out connection requests.
-
Continuing to nurture prospects until they accept the connection request.
-
Sending messages once the connection is established.
The beginning of the branch looks like this:
-
like a post
-
View profile (after two hours)
-
send a connection request
And this is how it looks on Dripify (next to the branch we already built):

Now, the process splits into two distinct branches:
-
One branch for prospects who have accepted our connection request.
-
Another branch for those who have yet to approve our connection.
Let’s focus on those who approved us
In this scenario, I recommend sending the first message to prospects as quickly as feasible, typically within an hour. This promptness helps to prevent prospects from suspecting automation. The flow here closely mirrors the one we’ve already established:
-
Message @1 (after two hours)
-
Wait for three days
-
Like a post
-
View profile (after two hours)
-
Message @2 (after two hours)
-
Wait for three days
-
Like a post
-
View profile (after two hours)
-
Message @3 (after two hours)
-
End of sequence
This is what it looks like on Dripify:

Now let’s create the last branch to nurture the prospects that haven’t approved our connection.
In this branch, the purpose of the workflow is the keep reminding the prospect that we exist until our connection request is been approved. I usually wait for seven days before I withrow the request and then start the entire process one more time.
These are the steps of the nurturing workflow:
-
wait for two days
-
Follow (wait for two days)
-
View profile (wait for 1 day)
-
Like a post (wait for 1 day)
-
Withdraw the connection request (Withdrawing the connection request is crucial as LinkedIn will lower your rank in case you have too many pending invitations).
In this branch, the workflow aims to continually remind the prospect of our presence until they approve our connection request. I typically wait seven days before withdrawing the request, and then I restart the entire process from the beginning.
This is how it looks on Dripify:

Full engagement and lead generation sequence on Dripify
Now, simply click “save template” to finalize your settings, and you are ready to proceed.
Open your first campaign on Dripify
With the template set up, it’s time to create our first campaign. The system is user-friendly and intuitive, but I’ll provide explanations here just in case:
-
Click on “Campaigns” in the navigation bar, then select “New campaign”.
-
Choose “Add leads”.
-
You will be prompted to add your leads. The simplest way to do this in Dripify is by copying and pasting the URL of your LinkedIn search results. Note that you can copy between 1000 to 2500 contacts at a time, so you’ll need to focus on highly segmented audiences for lead uploads.
-
After uploading the leads, click “Next”, select “Saved Templates”, and choose the template you’ve created.
-
Don’t click “Save and Launch” yet! Let’s continue to the next section to learn about integrating this data with your CRM.

Before we begin the explanation, let’s first understand why you might want to transfer data from LinkedIn to your CRM.
Transferring data to your CRM essentially involves scraping all publicly available information of a specific contact (i.e., the information shared by the user). With these connections in your CRM, you can utilize the data in several ways. Here are some examples:
-
Label them as “Marketing Qualified Leads” (MQL).
-
Compile a list of all connections acquired from LinkedIn.
-
Enroll them in an email campaign or sequence.
-
If they have provided their phone numbers, consider cold calling, sending text messages, etc.
-
Segregate the contacts based on their company’s industry.
There are of course other things that you can do after extracting your data from LinkedIn. You can read more on this in this article.
Indeed, prioritizing cost-effective solutions is practical, especially when it comes to automations. Opting for Make.com is a wise choice as it offers a wide range of options at competitive prices, making it a budget-friendly yet efficient tool for various automation needs.
Connecting Dripify to HubSpot using Make.com is straightforward. Just follow these instructions to set it up:
-
Sign up for or log in to Make.com.
-
Click on “Create a new scenario”.
-
Select “Webhooks” as the starting point, and then choose the “Custom Webhook” option.
-
You will then receive a webhook URL, which will look something like this:

Custom webhook
-
Copy the URL provided by Make.com.
-
Return to your Dripify campaign interface.
-
Under your Campaign Name, you’ll find an option to integrate Dripify with the webhook. Decide when you want the data to be pushed. For instance, in this example, choose to push the data every time a connection request is accepted.
-
Paste the webhook URL into the designated field.
-
Click ‘Test’ to ensure everything is set up correctly.
-
Once confirmed, go ahead and launch the campaign.

Upload leads from LinkedIn
-
Return to Make.com and continue the sequence setup.
-
Once you’ve received data via Dripify, decide where to inject it. While this example uses HubSpot, other options include Zoho, Pipedrive, Mailchimp, Monday, Twilio, etc.
-
To connect the data to HubSpot, select “add module” and search for “HubSpot CRM”. Choose “Create a Contact” and proceed with the verification instructions.
-
You’ll then need to specify the type of data to push to the CRM. Scroll down to “Properties”.
-
Begin matching the “Key” (the field you want to fill in HubSpot) with the “Value” (the data imported from Dripify).
-
Here’s an example of how to match these fields:

Matching properties
Activate the automation to begin transferring the data into your CRM seamlessly.
Best of luck. Write me in the comment section in case you have any question or remark.
Elad